


Bubble Strategy (5): Satellites and DONs
Before reading this lesson, you should have read through:
- Bubble Strategy (1): Introduction
- Bubble Strategy (2): Single Table SNGs
- Bubble Strategy (3): Multi-table SNGs Part 1
- Bubble Strategy (4): Multi-table SNGs Part 2
By now you should have a general idea about what the bubble phase is and how you should approach it in general. You have also learned about the intricacies of the bubble in single table SNGs specifically, as well as the nuances of the bubble in multi-table SNGs.
All this, however, has little use in satellite and double-or-nothing (DON) SNGs. The reason for this is quite simple – in the tournaments mentioned above it does not matter how many chips you end up with; since all top prizes are equal, the only goal is to survive the bubble, and that in turn changes the dynamics. To be more precise, one could say that it is the same kind of dynamics made extreme. What is crucial though is the fact that it should change the way you think about your strategy, and this is exactly what you are about to learn in this lesson.
Bubble Phase in a Satellite/DON SNG
The contents of this article can be applied to:
• any satellite SNG (or scheduled tournament) with more than one seat/package/ticket awarded,
• any double-or-nothing (and triple-or-nothing, etc.) SNG.
It should not be applied to satellites with a single top prize, because in these formats the bubble reduces to a heads-up match which is beyond the scope of this article. Also, it should not be applied to Fifty-Fifty and similar structures, which are a mixture of satellite and winner-takes-all.
The value of your stack equals your chance of making the money
The stack size is a variable that is in plain view, but in fact this is not a good predictor of an opponent's chances of cashing in satellites. What really is important is the $EV value of your stack, and this reduces simply to the probability of cashing. In effect, the stack sizes should never drive your decisions directly. Rather, you should think about stack setups in terms of the % chance of each player making the money.
Later on, you will learn how to use this approach to make informed decisions on a satellite bubble. For the moment, take a look at how stack sizes might translate to % chances of cashing.
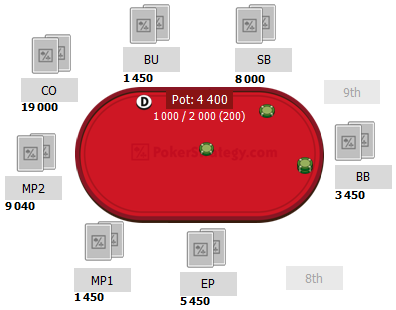
There are 7 players left with 6 top spots paying the same top prize. To get the first idea of how the chances of making the money look for each player, you should apply the ICM. Note that the ICM shows the probability of cashing before the blinds and antes have been posted, so the numbers in the table below may differ to some extent after the hand is dealt.
| Player | SB | BB | EP | MP1 | MP2 | CO | BU |
|---|---|---|---|---|---|---|---|
| Stack | 9200 | 5650 | 5650 | 1650 | 9240 | 19200 | 1650 |
| % chance (ICM) | 98% | 94% | 94% | 58% | 98% | 99.8% | 58% |
Based on the above results, the following conclusions can be drawn:
• The difference between being a medium stack and a large stack is small, and the difference between being a large stack and a very large stack is negligible;
• There is always much more to lose than there is to gain. If the chip leader was all-in against SB or MP2, he could lose 2% in cashing odds by losing the race, while winning could not possibly net him more than 0.2%. That means he would need over 90% equity to break even. This calculation will be explained later on;
• ICM’s biggest flaw is that it does not account for positions. With stacks deep compared to the blinds, the effect is negligible. With shallow stacks, the order in which the players blind out is of the utmost importance. In the above example, it is clear that in reality, BU’s chances are much better than those of MP1, as it is the latter who will face a forced all-in sooner. Similarly, EP’s chances look better than those of BB because, if both short stacks survive, it is BB who will be forced to go all-in sooner. ICM does not account for these differences, but you should.
Four steps of making a correct decision
Another factor which ICM does not account for is how the other players are playing. The more willing your opponents are to call all-ins, the tighter you should play. Your first thought on a satellite bubble should be, “what are my chances of making the money if I continue to fold each hand?”. With a large stack and loose opposition this is often so close to 100% that no risk is worth the reward. In such a case you should be in autofold mode. If you find it difficult, try not looking at the cards dealt.
Assume that the above is not the case; you might then consider entering a pot. In order to calculate the profitability of such play, you should follow the four steps. You need to:
• consider all possible outcomes (your stack after winning and loosing a given spot)
• estimate the probability of cashing for each outcome (evaluate your stack in each scenario)
• multiply this result by the probability of the scenario itself, and then add it altogether
• finally, you need to compare the resulting figure with the current probability of cashing, or more precisely the odds of cashing after a fold.
Take a look at how this could be performed in practice: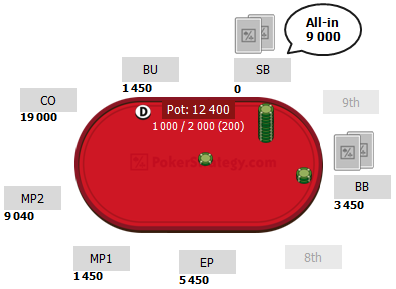
Let’s analyze BB's decision here. Assume SB is pushing with any two cards, as he might be tempted to do. The current odds of cashing for BB are 94%, according to ICM. In fact, due to the position setup, it might be a bit lower – probably around 92%. After he folds, this drops to around 85%. If he loses, it’s simple - he is out; therefore, his chances of cashing reduce to 0%. If he doubles through, his chances of winning would be around 99%. Thus, to breakeven on a call, he needs to have the following showdown equity (SDEq):
SDEq%*99% > 85%
SDEq% > 86%
That means even AA should be a fold here, even if SB shoves with any two:
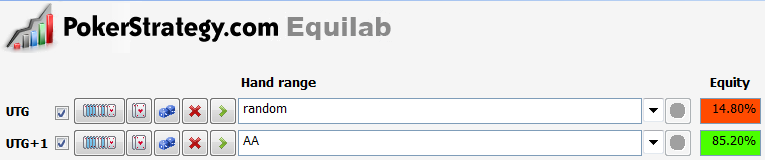
Now, if SB can reasonably believe BB understands that, he should push with any two because even though he hasn’t got much to gain, it is always better to gain a little something than not. In practice, lots of villains have problems with folding the top of their range and so SB should be much more wary. In this case, if BB was calling 40%, then SB should only push with his top 20%. As you can see, it is crucial for you to always have in mind your opponent’s potential calling range when considering a push – remember that their bad calls hurt not only them, but also you, benefiting all the other players due to the ICM.
Shortcuts, tips and tricks
Of course, during the session you don’t have access to ICM software. Therefore, you need to estimate the chances of cashing by yourself. It comes with experience, although there are a few common shortcuts that you can take.
Being a big stack means being a huge favourite
If you have a large stack, you can often assume you are a 100% favourite to cash. If there is a group of shortstacks with similar stacks, you can assume each of them busts with equal probability and the others all survive. Of course it is a simplification, but often it is enough to help make a correct decision.
Push instead of calling
If you decide to enter the pot, remember that fold equity is the most important factor. As a consequence, you should do everything to be the one going all-in - not calling one. You should manipulate your bet sizing in order to achieve that goal. Most commonly this includes overbet shoving preflop to close the action. Another consequence is that your repushing range should often be wider than your open pushing range because the risk is the same but you stand to gain more.
Stack setup is often more important than your cards
If you decide to push, the stacks behind you are much more important than your holding; it is always better to push if there are no short stacks left to act. Medium and large stacks should almost never call, while short stacks are forced to take a stand at one point or another. As a result, fold equity against short stacks and medium/large stacks differs tremendously.
Manipulate the blind increases as a short stack
Last but not least, you should remember that if you are one of the short stacks, you should always try to manipulate the blind increases so that larger blinds always hit the other short stacks first.
Take a look at the following example:
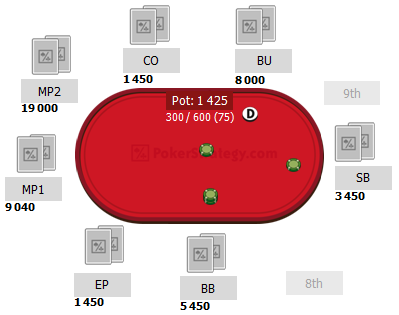
The blinds are about to be raised to 400/800 ante 100, meaning that the player who is now on the CO will be all-in on his small blind. It is crucial for him to make sure that the EP player is hit by either both blinds at the new level or at the very least the small blind at the new level. CO should use all of his allocated time bank to ensure that it happens. Otherwise, if the blinds get raised after going through EP, he will be able to survive longer than CO:
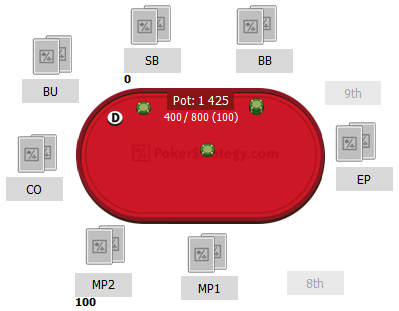
If, on the other hand, the EP player is hit by the higher blinds, he will be all-in either before CO, or on the same hand but with a smaller stack.
Summary
In this lesson you have learned that:
|
 |
EP (2000 chips) – 6.8% 10.0% 11.6% 12.8%
CO (3000 chips) 5.4% – 14.4% 16.3% 17.9%
BU (5000 chips) 4.7% 8.0% – 21.2% 23.1%
SB (7000 chips) 3.8% 6.2% 12.9% – 25.9%
BB (10000 chips) 2.9% 4.6% 8.7% 14.6% –