


Bubble Strategy (2): Single Table SNGs
Before reading this lesson, you should have read through:
By now you should have a general idea on what the bubble phase is and how you should approach it in general. In this lesson and the ones that will follow, you will learn how bubble dynamics differ between particular types of SNG tournaments.
This lesson focuses on single table tournaments (STTs). Two common structures will be considered – the 6-man SNG with a 65/35 payout structure, and the 9-man SNG with a 50/30/20 payout structure. The numbers represent the percentage of the prize pool allocated to each place respectively.
The bubble phase in a 6-man SNG
When it begins
By definition, as pointed out in the previous lesson, the bubble phase in a 6-man SNG with only the top two spots paid begins with 4 players left. Seventy per cent of the prize pool is allocated on the exact bubble, as two players secure at least a 35% payout. This means it is by far the most important part of the tournament. Therefore, the considerations in this lesson are limited to the bubble and it is assumed that there are always three players competing for the two paid spots.
Typical risk premium
Take a look at the following example of how stacks might look like at this stage:

Given that this is quite a standard stack setup, you should be able to recognize what the resulting risk premiums are. Take a look at the table below which shows the risk premium of each player against every other player. Note that the risk premium depends not only on the size of your stack, the payout structure and the number of players left, but also on the particular opponent’s stack size it is calculated against.
| Risk premium of ↓ against→ | BU | SB | BB |
|---|---|---|---|
| BU (1500 chips) | - | 8.0% | 2.7% |
| SB (1000 chips) | 17.7% | - | 2.9% |
| BB (500 chips) | 8.8% | 4.9% | - |
In these positions and with blinds at 50/100, the equilibrium pushing and calling ranges for the players look as follows:
- BU pushes 42.8% (22+ Ax+ K2s+ K7o+ Q4s+ Q9o+ J5s+ J9o+ T6s+ T8o+ 96s+ 86s+ 75s+ 65s 54s), SB calls 2.3% (TT+) to which BB overcalls AA only, BB calls 23.3% (33+ A2s+ A3o+ K9s+ KTo+ QTs+)
- SB pushes 76.4% (22+ Qx+ J2s+ J4o+ T2s+ T6o+ 92s+ 96o+ 83s+ 86o+ 73s+ 75o+ 63s+ 65o 52s+ 54o 42s+), BB calls 50.7% (22+ Kx+ Q2s+ Q5o+ J5s+ J8o+ T7s+ T8o+ 97s+)

Nash equilibrium ranges are, by definition, ranges that are optimal vs opponents who play optimally themselves. They will not be optimal vs players who deviate from the optimal strategy; by design they do not take advantage of any possible leaks, but they also cannot be exploited and therefore tend to be a good starting point in any situation.
Default gameplans for specific stack sizes
Based on the above results you can come up with the following conclusions:
- The big stack can exploit both players but he should put the most pressure on the medium stack, as he will have to call very tight.
- The medium stack should avoid any confrontation with the big stack; he can still push a reasonable amount of hands even when acting before the big stack, as the big stack cannot call too light.
- The short stack has to push quite tight (relative to stack size), as both opponents have low risk premiums against him and can call wide; he can, however, call quite wide (for the bubble) taking advantage of wide pushing ranges and great odds.
The above conclusions outline the default gameplan with all stack sizes. It is also important to point out that when opponents are calling appropriately or tighter than that, the main factor driving your pushing range is their risk premium against you. If they are calling too loose, your own risk premium against them becomes the main concern.
It is important to understand how extreme the bubble dynamics can get. Take a look at the following example:
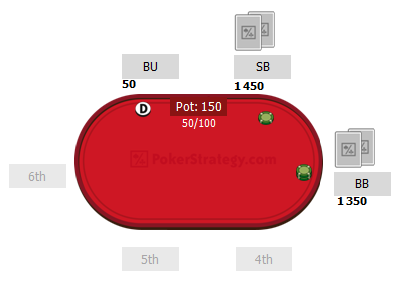
In this spot, the short stacked button has folded. Note what the SB and BB ranges look like in the equilibrium: SB pushes 100% (any two), BB calls 2.3% (TT+). Remember this example when you find yourself in a spot where there is a very short stacked player.
The bubble phase in a 9-man SNG
When it begins
By definition, the bubble phase in a 9-man SNG starts with 5 players left. Sixty per cent of the prize pool is allocated on the bubble, as three prevailing players secure a payout of at least 20%. It is less than the 70% allocated on a 6-man SNG bubble, but still constitutes more than a half of the prize pool. Therefore, the bubble phase remains to be of extreme importance. As a consequence, further considerations in this lesson will assume that there are four players fighting for three in-the-money spots.
Typical risk premium
Take a look at a typical stack setup at this stage of a tournament:
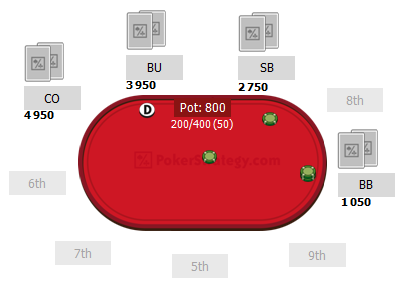
In the table below you can find the resulting risk premiums:
| Risk premium of ↓ against → | CO | BU | SB | BB |
|---|---|---|---|---|
| CO (5000 chips) | - | 14.5% | 8.9% | 3.6% |
| BU (4000 chips) | 21.8% | - | 11.7% | 4.2% |
| SB (3000 chips) | 19.7% | 18.3.% | - | 4.6% |
| BB (1500 chips) | 11.1% | 9.8% | 7.5% | - |
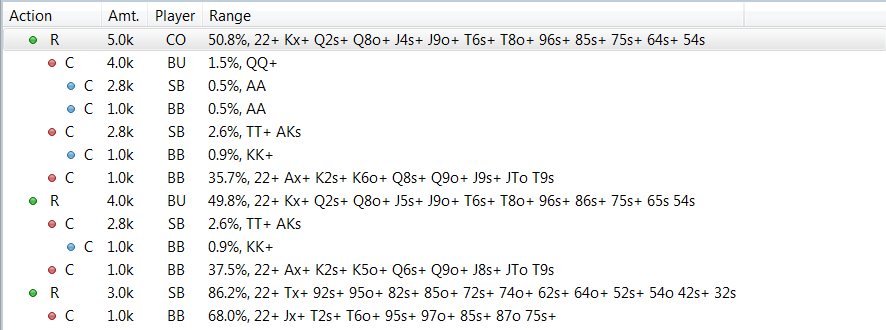
In the above example, with blinds at 200/400 ante 50, equilibrium ranges are as follows:
- CO pushes 50.8% (22+ Kx+ Q2s+ Q8o+ J4s+ J9o+ T6s+ T8o+ 96s+ 85s+ 75s+ 64s+ 54s), BU calls 1.4% (QQ+) to which SB/BB overcall AA only, SB calls 2.6% (TT+, AKs) to which BB overcalls KK+, BB calls 31.8% (22+ Ax+ K4s+ K7o+ Q9s+ QTo+ J9s+)
- BU pushes 50.0% (22+ Kx+ Q2s+ Q8o+ J5s+ J9o+ T6s+ T8o+ 96s+ 86s+ 75s+ 65s 54s), SB calls 2.6% (TT+, AKs) to which BB overcalls KK+, BB calls 37.6% (22+ Ax+ K2s+ K5o+ Q6s+ Q9o+ J8s+ JTo T9s)
- SB pushes 85.6% (22+ Tx+ 92s+ 95o+ 82s+ 85o+ 72s+ 75o+ 62s+ 64o+ 52s+ 54o 42s+ 32s), BB calls 68.0% (22+ Jx+ T2s+ T6o+ 95s+ 97o+ 85s+ 87o 75s+)
Default gameplans for specific stack sizes
The general conclusions are the same as in the case of a 6-man SNG, however there is one thing that shows here more, as a result of there being more players.
- With four players left, there is more room for the stacks to vary in size, which results in risk premiums being higher and more opponent dependent.
Let’s end with a more extreme example: 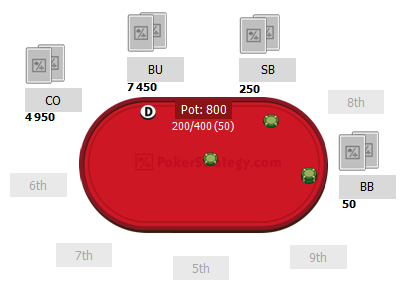
In this spot there are two very short stacked players. However, one of them – namely the big blind – has to call in this hand; otherwise he would be all-in for the next one with little chance of rebuilding. CO has already folded. The equilibrium solution is for BU to push 81.9%, while SB can only call 20.1% – despite being clearly committed chip EV-wise he needs to wait for BB to bust. BB normally calls any two, but when SB calls in front of him, he should fold the bottom 11.4% because with the very worst hands it is better to sacrifice the slim chance of rebuilding to let SB bust in fourth.
Summary
In this, lesson you have learned that:
|
 |